

When taking my Apple Teacher quizzes to earn badges, I remember wondering why I would ever need the Magic Move slide transition... and I won't even tell you how many times I had to repeat this question on the quiz before getting it right. 🙄
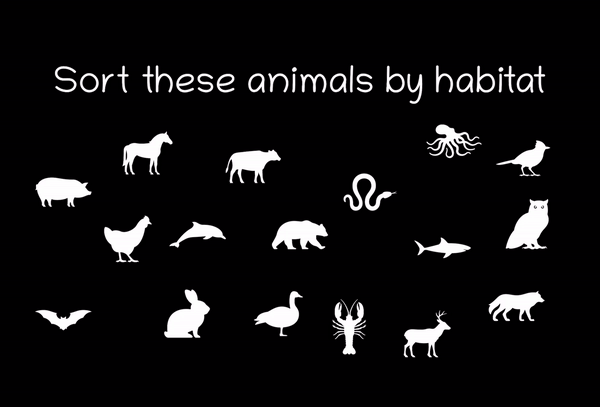
But then one day, when preparing slides to review sorting shapes, I had my aha moment. And I sure am glad I finally had that knowledge.
What is Magic Move in Keynote?
Magic Move is a slide transition that shows objects in the slide move position and/or size. It's a feature unique to Apple Keynote that you can't have in Google Slides or PowerPoint. Learn more about using Google fonts in Keynote here.
Step-by-Step Instructions for Keynote: (video tutorial below)

Prepare your slide with all the text and objects you plan to use in its first stage. Adjust all the formatting for size, color, shape and fonts here. (If you want to adjust it later, you will have to apply it to each slide separately.)

Select the slide on the sidebar, tap it so that the options appear in a list to the right and select Transition.

The transition options will appear along the bottom of the screen. Tap Magic Move and wait while the screen shows a preview. Then tap Done on the top right corner of the screen.

A notice will appear on the screen and ask if you want to duplicate the slide... yes, you want to duplicate.

Once the slide is duplicated, select the second (duplicated) slide and rearrange the objects in the new positions and sizes.
Preview your transition by selecting the first slide, then press play/present.
You can continue to add slides and allow the transition to take place multiple times. I have used this when there is the possibility to sort objects in multiple ways, the show phases of the moon, how shadows work with the movement of the sun and the food chain. Here is an example of using the transition multiple times:
Video Tutorial
At first, I thought Magic Move would be more troublesome than it was worth to apply this transition, but it is actually quite simple and quick to use. I hope you find a creative use for this in your teaching. If you do, share in the comments or tag me on your social media @ouryellowbench 😊

If you're as crazy about fonts as I am, check out this blog post about getting Google fonts for use in Keynote or PowerPoint and suggested font pairings, special for the classroom. It includes all you need to know about choosing fonts and arranging text in teaching slides.
Happy learning and teaching, pedagogical friends!
💛 Sativa
PS. Did you know that you can get an absolutely FREE teaching resource from me each month? It's true! Sign up here for my monthly newsletter and get something unique, creative and beautiful for your classroom every month 🥰
Follow me on Facebook, Instagram or Pinterest or to get regular doses of my teacher thought sketchnotes, like these: